Understanding Design Patterns: Builder
• • 13 min readThere are 23 classic design patterns which are described in the original book Design Patterns: Elements of Reusable Object-Oriented Software. These patterns provide solutions to particular problems often repeated in software development.
In this article, I am going to describe how the Builder Pattern works and when it should be applied.
Builder Pattern: Basic Idea
The builder pattern is a design pattern designed to provide a flexible solution to various object creation problems in object-oriented programming. The intent of the Builder design pattern is to separate the construction of a complex object from its representation — Wikipedia
Separate the construction of a complex object from its representation so that the same construction process can create different representations — Design Patterns: Elements of Reusable Object-Oriented Software
On many occasions, the constructors of a class have a long list of arguments that have no semantic value, or that are not used by all instances of that class. This causes constructors to have a long list of arguments or having to define many constructors with different parameters, causing an explosion of constructor methods in the class.
The following code shows the classic problem in which there is a constructor with a list of parameters that must be initialized, even though the object in question does not require to have values in some of its attributes.
new User('carlos', 'Caballero', 26, true, true, false, null, null);
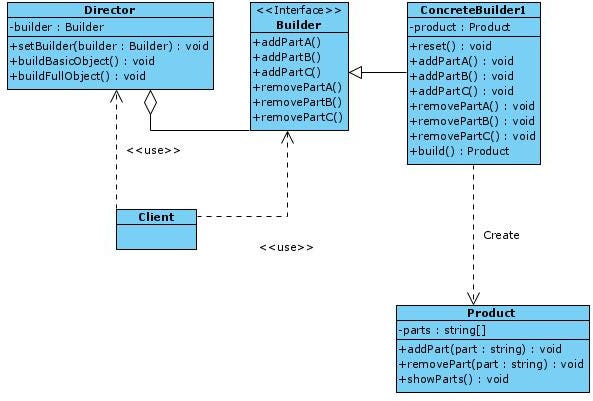
The Builder pattern allows us to write clearer code, since it avoids the problem posed above. The UML diagram of this pattern is as follows:

The classes that make up this pattern are the following:
-
Product is the concrete result of a construction process. That is, they will be the models of our application.
-
Builder is a common interface for the concrete builders.
-
ConcreteBuilder are different implementations of the constructive process. These classes will be responsible for clarifying the differences in the business logic of each of the object construction processes.
These classes will be responsible for clarifying the differences between the business logic of each of the object construction processes.
-
Director defines the order in which the construction steps are performed. Its purpose is the reusability of specific configurations. The
Directorcan be omitted in some implementations of this pattern, although its use is highly recommended, since it abstracts the client from the concrete steps of construction to the client. -
Client is the class that uses the pattern. There are two possibilities:
1 - The client uses the ConcreteBuilder, executing the construction steps one by one.
2 - The client uses the Director which implements each of the construction processes, and acts as an intermediary between the Client and the ConcreteBuilder classes.
Builder Pattern: When To Use
-
The problem solved by the Builder pattern is easy to identify: this pattern should be used when it is necessary to use a constructor with a very long parameter list or when there is a long list of constructors with different parameters.
-
When it is necessary to build different representations of the same object. That is, when objects of the same class with different characteristics are needed.
Builder Pattern: Advantages and disadvantages
The Builder pattern has a number of advantages that can be summarized in the following points:
-
Objects can be created step by step.
-
The creation of an object can be postponed until all the necessary information for the construction of the same is available. The object will not be obtained until the
buildmethod of the Builder class is executed. -
Clean code: The Single Responsibility Principle (SRP) is applied, since the complex construction of the object is isolated from the business logic of this object.
However, the main drawback of the builder pattern is the increased complexity in the code, and the increased number of classes required. This a well known disadvantage when applying design patterns, since this is the price that must be paid in order to gain abstraction in the code.
Next we are going to illustrate three examples of application of the Builder pattern:
-
Basic structure of the Builder pattern. In this example we are going to translate the theoretical UML diagram into TypeScript code in order to identify each of the classes involved in the pattern.
-
Creation of characters in a video game. Let’s think of the classic WoW (World of Warcraft) scenario in which the player can select between two races: Humans and Orcs.
-
Creation of products (Burgers) in a Point Of Sale (POS).
The following examples will show the implementation of this pattern using TypeScript. We have chosen TypeScript to carry out this implementation rather than JavaScript, since the latter lacks interfaces or abstract classes and therefore, the responsibility of implementing both the interface and the abstract class would fall on the developer.
Example 1 — Basic structure of the Builder pattern
In this first example we are going to translate the theoretical UML diagram into TypeScript code to test the potential of this pattern. The diagram to be implemented is the following:
First we are going to define the model (Product) of our problem. In this class it is modeled that we will have a list of parts that is simply a list of strings . For this we define the classic addPart, removePart and showParts methods to manage this attribute.
However, note that the constructor of the object does not receive the list of initial parameters (in TypeScript it is not necessary to define it), but the model attribute will be modified through methods.
export class Product {
   public parts: string[] = [];

   public addPart(part: string): void {
       this.parts.push(part);
   }
   public removePart(part: string): void {
       this.parts = this.parts.filter(_part => _part !== part);
   }

   public showParts(): void {
       console.log(`Product parts: ${this.parts.join(', ')}\n`);
   }
}
The next step is to create the builder interface that defines the concrete builders. In the builder, the operations to add and remove each of the parts (A, B and C) are defined.
export interface Builder {
    addPartA(): void;
    addPartB(): void;
    addPartC(): void;
    removePartA(): void;
    removePartB(): void;
    removePartC(): void;
}
The concrete builder class has a private object of the class that we want to build (Product). The necessary modifications will be applied to its attributes to build the object according to each case.
Note that what the constructor method does is initialize the product, and that there is a build method that this is responsible of returning the object that has been configured in the ConcreteBuilder1 class and reset the internal object to be able to build another object. The ConcreteBuilder1 class configures a concrete object until the build method is invoked.
Note that what the constructor method does is initialize the product, and that there is a build method that is responsible of returning the object that has been configured in the ConcreteBuilder1 class and resetting the internal object to be able to build another object. The ConcreteBuilder1 class configures a concrete object until the build method is invoked.
import { Builder } from "./builder.interface";
import { Product } from "./product";

export class ConcreteBuilder1 implements Builder {
    private product: Product;

    constructor() {
        this.reset();
    }

    public reset(): void {
        this.product = new Product();
    }

    /**
     * Steps
     */
    public addPartA(): void {
        this.product.addPart('PartA1');
    }

    public addPartB(): void {
        this.product.addPart('PartB1');
    }

    public addPartC(): void {
        this.product.addPart('PartC1');
    }

    public removePartA(): void {
        this.product.removePart('PartA1');
    }

    public removePartB(): void {
        this.product.removePart('PartB1');
    }

    public removePartC(): void {
        this.product.removePart('PartC1');
    }

    public build(): Product {
        const result = this.product;
        this.reset();
        return result;
    }
}
Once we have the concrete operations to build an object through the ConcreteBuild1 class, the next step is to define concrete steps to perform different constructions. The Director class is responsible for defining methods that specify the construction steps using the Builder object.
Therefore, the Director class receives an object from the Builder class as a parameter (in this case it would be BuilderConcrete1) and several constructions are defined:
-
BasicObject→ It only consists of part A. -
FullObject→ It consists of parts A, B and C.
import { Builder } from "./builder.interface";

export class Director {
    private builder: Builder;

    public setBuilder(builder: Builder): void {
        this.builder = builder;
    }

    public buildBasicObject(): void {
        this.builder.addPartA();
    }

    public buildFullObject(): void {
        this.builder.addPartA();
        this.builder.addPartB();
        this.builder.addPartC();
    }
}
Finally, it would be necessary to define the Client or Context class that makes use of the pattern. This client is quite clean since you only define the Builder object that you want to use and the creation of objects is invoked through the Director.
import { ConcreteBuilder1 } from './concrete-builder1';
import { Director } from './director';

function client(director: Director) {
    const builder = new ConcreteBuilder1();
    director.setBuilder(builder);

    console.log('A preconfigured basic object:');
    director.buildBasicObject();
    builder.build().showParts();

    console.log('A preconfigured full object:');
    director.buildFullObject();
    builder.build().showParts();

    // A custom object can be create without a Director class.
    console.log('Custom product:');
    builder.addPartA();
    builder.addPartC();
    builder.build().showParts();
}

const director = new Director();
client(director);
Example 2 — Creation of Heroes of a video game
Once the classic theoretical example has been presented to understand the responsibilities of each of the classes of the pattern, we are going to present another example in which we identify each of these classes with a specific problem.
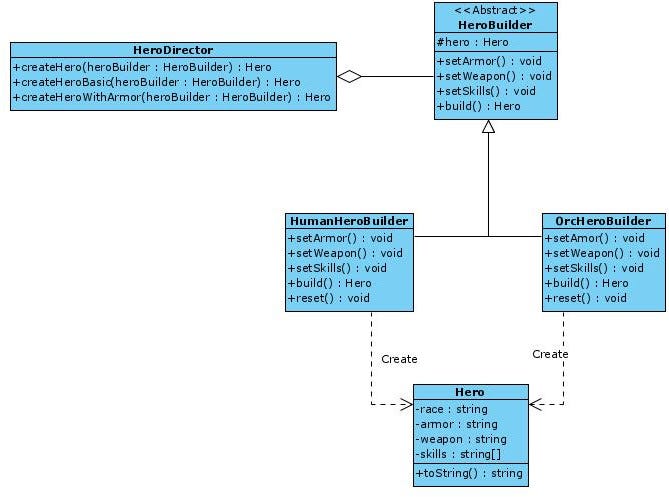
Our problem is the representation of different heroes or characters in a video game. We will focus on the classic WoW (World of Warcraft) game, in which the heroes can be divided into two races: Humans and Orcs. In addition, each of these heroes can have armor, weapon or different skills depending on whether the hero is human or orc.
In the event that the Builder pattern is not applied, it causes a constructor to be defined in the Hero class with a long list of parameters (race, armor, skills...), which in turn, cause logic to be defined in the constructor to decide if the armor is human or orc. So, with this initial solution the problem is coupled since any change in the business logic would make rewriting quite a few pieces of code, with hardly any possibility of reuse.
In the event that the Builder pattern is not applied, it causes a constructor to be defined in the Hero class with a long list of parameters (race, armor, skills...), which in turn, causes logic to be defined in the constructor to decide whether the armor is human or orc. With this initial solution the problem is coupled, since any change in the business logic would require rewriting quite a few pieces of code, with hardly any possibility of reuse.
Therefore, the first thing we have to do is stop and think about how the Builder pattern helps us solve this problem. So, we focus on showing the UML diagram that solves this problem and we begin to implement it.
In this example we are going to follow the same order as in the previous example and we are going to start with the model or object that we want to build flexibly.
The Hero class defines the race, armor, weapon and skills properties which in our example for simplicity are simple character strings. All these attributes could be objects but to simplify the example we have left them as character strings.
export class Hero {
    public race: string;
    public armor: string;
    public weapon: string;
    public skills: string[];


   public toString(): string {
        return `Hero:
                   race=${this.race ? this.race : 'empty'}
                   armor=${this.armor ? this.armor: 'empty'}
                   weapon=${this.weapon ? this.weapon: 'empty'}
                   skills=${this.skills ? this.skills: 'empty'}
                 `;
	}
}
The HeroBuilder interface defines the methods that the specific builders will have. Let’s observe that we will have the Hero object that will be configured little by little, each of the methods that allows the configuration of the object: setArmor, setWeapon and setSkills; and finally we will have the build method that finishes the configuration of the object and extracts the Hero object.
import { Hero } from "./hero.model";

export abstract class HeroBuilder {
	protected hero: Hero;

	public abstract setArmor(): void;
  	public abstract setWeapon(): void;
  	public abstract setSkills(): void;

	public abstract build(): Hero;
}
Once the builder is defined (as an abstract class or interface) we must build the two specific builders that our problem requires: HumanHeroBuilder and OrcHeroBuilder. In the demo code we have completed with a different string according to each builder. It is important to note that the build method of each of the builders will return the built object (Hero) and reset the state of the object to be able to build another object.
import { Hero } from "./hero.model";
import { HeroBuilder } from "./hero-builder";

export class HumanHeroBuilder extends HeroBuilder {

    constructor() {
    	super();
        this.reset();
    }

    public reset() {
      	this.hero = new Hero();
        this.hero.race = "Human";
    }

    public setArmor():void {
        this.hero.armor = "Human armor";
    }

    public setWeapon(): void {
      	this.hero.weapon = 'Human weapon';
    }

    public setSkills(): void {
      	this.hero.skills = ['Human skill1', 'Human skill2'];
    }

    public build(): Hero {
      	const hero = this.hero;
      	this.reset();
      	return hero;
    }
}
import { Hero } from "./hero.model";
import { HeroBuilder } from "./hero-builder";

export class OrcHeroBuilder extends HeroBuilder {

    constructor() {
    	super();
        this.reset();
    }

    public reset() {
     	this.hero = new Hero();
        this.hero.race = "Orc";
    }

    public setArmor():void {
        this.hero.armor = "Orc armor";
    }

    public setWeapon(): void {
      	this.hero.weapon = 'Orc weapon';
    }

    public setSkills(): void {
      	this.hero.skills = ['Orc skill1', 'Orc skill2'];
    }

    public build(): Hero {
      	const hero = this.hero;
      	this.reset();
      	return hero;
    }
}
The last element of the pattern would be the Hero-Director class that allows you to store configurations that are repeated throughout the code. In our example we have created three Hero creation setups. For example, the createHero method builds a complete hero, that is, it assigns armor, abilities and weapons. In addition, we create a hero without any equipment through the createHeroBasic method and, finally, to illustrate another configuration, the createHeroWithArmor method is defined, which returns a hero in which only the armor has been assigned.
import { HeroBuilder } from "./hero-builder";

export class HeroDirector {

    public createHero (heroBuilder: HeroBuilder) {
        heroBuilder.setArmor();
        heroBuilder.setSkills();
    	heroBuilder.setWeapon();
    	return heroBuilder.build();
  }

  public createHeroBasic (heroBuilder: HeroBuilder){
	return heroBuilder.build();
  }

  public createHeroWithArmor(heroBuilder: HeroBuilder){
	heroBuilder.setArmor();
    return heroBuilder.build();
 }

}
Finally, we will show a console client that makes use of the two builders that we have built throughout this example. In this example we create the two builders: HumanHeroBuilder and OrcHeroBuilder; and the director’s class: HeroDirector. As a demonstration, we will use the two builders together with the director to create the three hero configurations that the HeroDirector class has preconfigured.
import { HeroDirector } from "./hero-director";
import { HumanHeroBuilder } from "./human-hero-builder";
import { OrcHeroBuilder } from "./orc-hero-builder";

const humanBuilder = new HumanHeroBuilder();
const orcBuilder = new OrcHeroBuilder();
const heroDirector = new HeroDirector();

const humanHero = heroDirector.createHero(humanBuilder);
const humanHeroWithArmor = heroDirector.createHeroWithArmor(humanBuilder);
const humanHeroBasic = heroDirector.createHeroBasic(humanBuilder);

console.log(humanHero.toString());
console.log(humanHeroWithArmor.toString());
console.log(humanHeroBasic.toString());

const orcHero = heroDirector.createHero(orcBuilder);
const orcHeroWithArmor = heroDirector.createHeroWithArmor(orcBuilder);
const orcHeroBasic = heroDirector.createHeroBasic(orcBuilder);

console.log(orcHero.toString());
console.log(orcHeroWithArmor.toString());
console.log(orcHeroBasic.toString());
Example 3 — Creation of burgers (Point of Sale)
In the following example we are going to create a POS for a burger restaurant. The main change in this example compared to the previous ones is that each modification operation of the object to be created, instead of not returning any value, will return the builder itself. In this way, the different operations to be carried out by the builder itself can be chained, since each operation returns the Builder object.
Following the same methodology that we have presented in the previous examples, we are going to start by looking at the UML diagram that will help us identify each of the parts of this pattern.
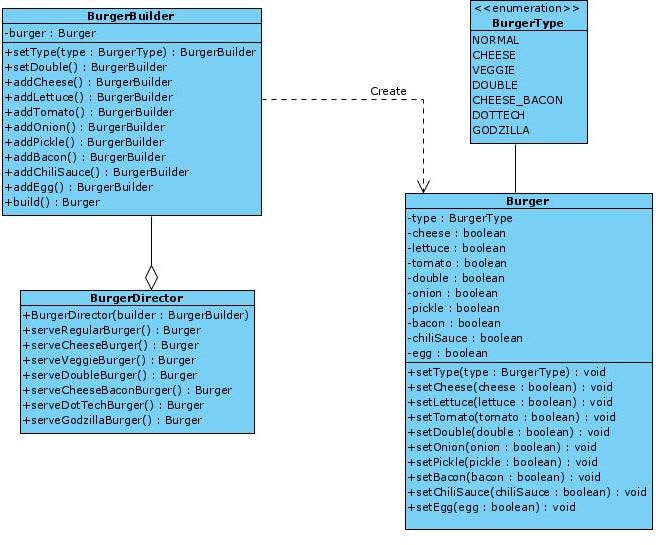
In this case, the object we want to build would be the one corresponding to the Burger class where there is a list of ingredients to configure in each of the burgers. The Burger class will have accessor methods corresponding to each of its attributes.
The code associated with this class is the following:
import { BurgerType } from "./burger-type.interface";

export class Burger {
    public type: BurgerType = BurgerType.NORMAL;
    public cheese = false;
    public lettuce = false;
    public tomato = false;
    public double = false;
    public onion = false;
    public pickle = false;
    public bacon = false;
    public chiliSauce = false;
    public egg = false;

    public setType(type: BurgerType){
        this.type = type;
    }

    public setCheese() {
        this.cheese = true;
    }

    public setLettuce() {
        this.lettuce = true;
    }

    public setTomate() {
        this.tomato = true;
    }

    public setDouble() {
        this.double = true;
    }

    public setOnion() {
        this.onion = true;
    }

    public setPickle() {
        this.pickle = true;
    }

    public setBacon() {
       this. bacon = true;
    }

    public setChiliSauce() {
        this.chiliSauce = true;
    }

    public setEgg() {
        this.egg = true;
    }
}
In this example, the BurgerType enumerated type has been included, which allows defining the different types of burgers that exist in the application.
export enum BurgerType {
    NORMAL,
    CHEESE,
    VEGGIE,
    DOUBLE,
    CHEESE_BACON,
    DOTTECH,
    GODZILLA
}
In the BurgerBuilder class, each method performs the modification on the object that is being configured, and also, the builder is being returned to be able to chain the different operations. Of course, the build method still returns the Burger class object.
import { Burger } from "./burger.model";
import { BurgerType } from "./burger-type.interface";

export class BurgerBuilder {
    private burger: Burger;


    public constructor(){
        this.burger = new Burger();
    }

    public setType(type: BurgerType): BurgerBuilder{
        this.burger.setType(type);
        return this;
    }

    public setDouble(): BurgerBuilder{
        this.burger.setDouble();
        return this;
    }

    public addCheese(): BurgerBuilder{
        this.burger.setCheese();
        return this;
    }

    public addLettuce(): BurgerBuilder{
        this.burger.setLettuce();
        return this;
    }

    public addTomato(): BurgerBuilder{
        this.burger.setTomate();
        return this;
    }


    public addOnion(): BurgerBuilder{
        this.burger.setOnion();
        return this;
    }

    public addPickle(): BurgerBuilder{
        this.burger.setPickle();
        return this;
    }

    public addBacon(): BurgerBuilder{
        this.burger.setBacon();
        return this;
    }

    public addChiliSauce(): BurgerBuilder{
        this.burger.setChiliSauce();
        return this;
    }

    public addEgg(): BurgerBuilder{
        this.burger.setEgg();
        return this;
    }

    public build(): Burger{
        return this.burger;
    }
}
The BurgerDirector class is in charge of configuring the operations defined in the BurgerBuilder class. This is where you can see how different types of burgers are configured using the chained methods, which allows for ease of reading the code. It is important to remember that until the build method is executed, the same burger is being configured.
import { Burger } from "./burger.model";
import { BurgerBuilder } from "./burger-builder";
import { BurgerType } from "./burger-type.interface";

export class BurgerDirector {

    public constructor(private builder: BurgerBuilder){
        this.builder = builder;
    }

    public serveRegularBurger(): Burger{
        return this.builder
                    .setType(BurgerType.NORMAL)
                    .build();
    }

    public serveCheeseBurger() : Burger{
        return this.builder
                    .addCheese()
                    .setType(BurgerType.CHEESE)
                    .build();
    }

    public serveVeggieBurger(): Burger{
        return this.builder
                    .addCheese()
                    .addLettuce()
                    .addTomato()
                    .setType(BurgerType.VEGGIE)
                    .build();
    }

    public serverDoubleBurger(): Burger{
        return this.builder.setDouble()
                      .setType(BurgerType.DOUBLE)
                      .build();
    }


    public serveCheeseBaconBurger(): Burger{
        return this.builder.addCheese()
                      .addBacon()
                      .setType(BurgerType.CHEESE_BACON)
                      .build();
    }
}
Finally, we show the client that uses the pattern. In this case, a random number is selected that defines a type of burger and the director is invoked to serve us that burger.
import { Burger } from "./burger.model";
import { BurgerBuilder } from "./burger-builder";
import { BurgerDirector } from "./buger-director";

let burger: Burger;

const burgerType = Math.round(Math.random() * 6);
console.log('BurgerType: ', burgerType);

const burgerBuilder: BurgerBuilder = new BurgerBuilder();
const burgerDirector: BurgerDirector =  new BurgerDirector(burgerBuilder);


switch (burgerType) {
    case 1:
        burger = burgerDirector.serveRegularBurger();
        break;
    case 2:
        burger = burgerDirector.serveCheeseBurger();
        break;
    case 3:
        burger = burgerDirector.serveVeggieBurger();
        break;
    case 4:
        burger = burgerDirector.serverDoubleBurger();
        break;
    case 5:
        burger = burgerDirector.serveCheeseBaconBurger();
        break;
    case 6:
        burger = burgerDirector.serveDotTechBurger();
        break;
    default:
        burger = burgerDirector.serveGozillaBurger();
        break;
}

console.log(burger);
Finally, I have created three npm scripts through which the code presented in this article can be executed:
    npm run example1
    npm run example2
    npm run example3
GitHub Repo: https://github.com/Caballerog/blog/tree/master/builder-pattern
Conclusion
Builder is a design pattern that allows you to avoid having constructors with a long list of parameters in which not always all the parameters are required. It allows you to build instances of a certain object in a more flexible way, since you can configure only the attributes that are strictly necessary.
The code is much cleaner since there will be no parameters in the constructors that are not used, allowing only those parameters that are required to create the object to be used. Furthermore, since there is a Director class for the builders, the object creation configurations are reused so that there is no direct interaction with the Builder classes on the client.
Finally, the most important thing about this pattern is not the specific implementation of it, but being able to recognize the problem that this pattern can solve, and when it can be applied. The specific implementation is the least of it, since it will vary depending on the programming language used.